Configuring a CentOS 7 Kerberos KDC
We will now configure a Kerberos KDC that we can use for authentication. In this tutorial we will configure a CentOS 7.1 host as a KDC and also use it as a Kerberos client to authenticate SSH logins. In a later tutorial we will add in a second client server. By the end of this tutorial you will be comfortable with configuring a CentOS 7 Kerberos KDC.
What is Kerberos
Kerberos is an authentication mechanism. Once authenticated to the Kerberos server a client is issued a token. This token can be used to authenticate the client to Kerberized Services such as SSH. In this way we can login to the Kerberos server once and use the token for password-less logins. In practice this means when using SSH to remotely manage many servers I can login once a day to the KDC and use the token to authenticate to all the others servers without the need of further passwords. By default a token lasts 24 hours but is adjustable.
Prerequisites
Time services will need to be configured on the KDC and the servers that make use of it. In my scenario the servers that I will use are on the same VM host and will then share the same time. We will also need to resolve host names through DNS or in the demonstration we will use local host files. In this demo we will use just the one server but in the next tutorial we ill introduce the 2nd client server. The KDC will be s1.tup.com and the 2nd server will be s2.tup.com. On both servers I have host file entries for both servers.
Install Software on KDC s1.tup.com
# yum install -y krb5-server krb5-workstation pam_krb5
Edit Server Configuration Files
The configuration files for the server are located in the directory /var/kerberos/krb5kdc . We have two files to edit so we will move to this directory:
cd /var/kerberos/krb5kdc
There will be two files in this directory:
- kdc.conf
- kadm5.acl
The conf file is the server configuration and the acl file, well the ACL. The ACL grants all privileges to anyone one with the admin role. In each file we need to change the Kerberos realm from EXAMPLE.COM to your own realm name. In out case this is TUP.COM.
The kadm5.acl is listed in the following screenshot:
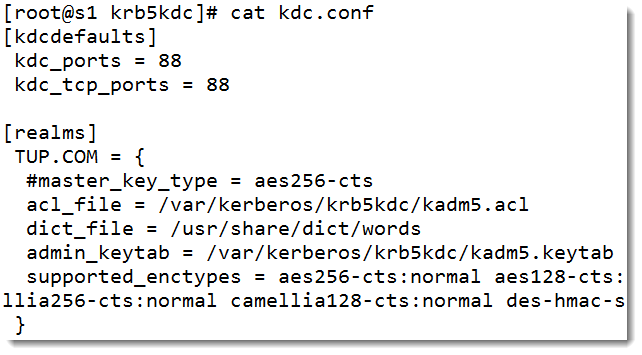
 The kdc.conf file is shown below:
 Edit the Client Configuration
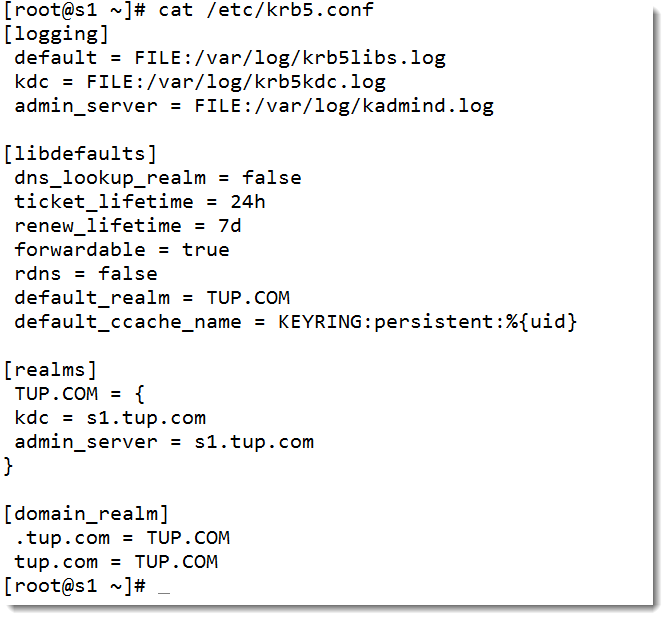
The server that we are using as the KDC will also be a Kerberos client, allowing users to authenticate via Kerberos to services that is hosts. For this we edit the file: /etc/krb5.conf. In this file we remove the comment (#) at the start of any of the lines. We then again replace all instances of EXAMPLE.COM with our own realm. In my case TUP.COM. We do this both for the DNS name in lower-case and the realm name in upper-case. My file is shown in the following screenshot:
 Take care in editing the file to ensure all changes have been made. This file can act as the default for any new file added to the realm. We simply copy this file to the next client.
Create the KDC Database
When creating the KDC database we will need an entropy pool of random data. Please check that your rngd service is running correctly as it does not by default in CentOS 7 or 7.1. you can read my post on setting this up here. You will be prompted to set a secure password to the database key when you run the following command.
kdb5_util create -s -r TUP.COM
Start and Enable Kerberos
We are now ready to start and enable the two services:
systemctl start krb5kdc kadmin
systemctl enable krb5kdc kadmin
Create Principals
Objects in the KDC database are known as principals and can be users or hosts. We will assign root admin rights and are standard user tux will be added in as a user so they can use Kerberized services:
# kadmin.local
kadmin.local: addprinc root/admin
kadmin.local: addprinc tup
kadmin.local: quit
We will now add in the host s1.tup.com so that it may host Kerberized services. We must add principals for each user and server that will use Kerberos. We will also copy the encrypted Kerberos keytab file to the new host.
# kadmin.local
kadmin.local: addprinc -randkey host/s1.tup.com
kadmin.local: ktadd host/s1.tup.com
kadmin.local: quit
Configure SSH Client
On the Kerberos client server we need to edit the SSH Client file to allow all clients by default to use Kerberos authentication. To do this edit the file /etc/ssh/ssh_config and add the lines:
GSSAPIAuthentication yes
GSSAPIDelegateCredentials yes
Allow Kerberos Authentication to the Server
From the command line we can allow Kerberos authentication either using authconfig-tui or simply with the command:
# authconfig --enablekrb5 --update
This will make the changes tot he PAM configuration. I would also reload SSH at this stage to be certain everything is in place:
# systemctl reload sshd
I have now firewall in place but if you use a host based firewall you will need to open port 88 on TCP and UDP.
Test SSH Authentication Using Kerberos
Login to s1.tup.com as a the standard user you added to the Kerberos database. In may case this was the user tux. Connect to the KDC and authenticate to receive a token with the following command:
$ kinit
You can list your token with klist:
$ klist
The output from klist is shown in the following screenshot:
You will now be able to authenticate using Kerberos to the SSH server:
$ ssh s1.tup.com
You may have to accept the public key if this is the first connect but you will not be prompted for a password. If we have more SSH servers in the realm then the behavior would be the same. We would run kinit just the once and we would be able to access all of the servers in the realm with the one the single password authentication.
The following video can step you through the process:
The Urban Penguin is your comprehensive provider for professional Linux software development, training and services. Every day decision makers are barraged with information on Windows vs. Open Source. Making a decision on which platform to bet your business on is a critical decision and significant investment. We offer industry-leading cost-effective business solutions using the Linux platform. World-renown Linux expert, Andrew Mallett, believes in the Open Source platform. Let The Urban Penguin help you make the best decisions for your software development and business needs.


