Working on the CLI with YUM History on CentOS 7
When you are Learning Linux on a Red Hat based system you will learn YUM. The management tool is well known and well used but all too often administrators are not shown or are not aware of the yum history features and their power. So whether you are working on Fedora, RHEL, CentOS or Scientific Linux you are going to benefit by reading more about YUM.
YUM, Yellowdog Updater Modifed, purely sits in a layer above the RPM, Red Hat Package Manager. We still install and remove RPM files and their presence in registered within a database. Yum history can make use of this database and the transaction that are written to the database. To begin with we can list transactions in the RPM database using the following command:
# yum history
or, in longer hand:
# yum history list
The list is implied so we do not need to include it.
Depending on you software activity this may be long or short but shows you a list of software actions, installing or erasing packages on the system. If we want to have a new starting point to clear out the existing history we can do so using:
# yum history new
If we try now to run a history list after this we will get an error as there is no history. So the error can be safely disregarded. We simply cleared the history to simplify the list as we look at it during the exercises.
If I want so install the port scanner, nmap I can run the command:
# yum install nmap
In doing so it may well want to add in dependencies. On my system it will install two packages nmap and nmap-ncat. Go ahead and install the packages. With the packages installed when we now run the history list we see that we have installed the two packages:
# yum history list

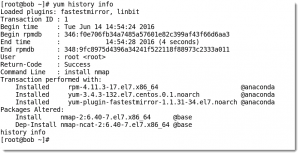
If we wanted to check exactly what happen we can use the following command referencing the transaction ID in the first column of the output from yum :
# yum history info 1
Or more simply as it was the most recent event in our history we can use:
# yum history info

This now starts to show the real power behind what we can do with yum history. Let’s say that this was a mistake. Sure, I could remove nmap easily but remember to remove all of the dependencies is not so easy. In this case it was just one but in other cases or in the case of a group install their will be many packages.
If I do want to reverse a transaction then the verb we use with yum’s history command is “undo“. As in the following command:
# yum history undo 1
Or if we do not want to be prompted
# yum history undo -y 1
Let’s take this a little further by running an update on our system:
# yum update
On my system this is installing one package and updating 75. [The kernel package will always be installed rather than updating so we can boot to the earlier kernel if we need]. If we need to reverse this action then we will need the power of YUM and its history.
We can run yum history gain and on my system transaction ID 3 show the update and 76 altered packages on my system. If we now experience issues it is very easy to reverse this with:
# yum history undo -y 3
I will leave it to you to deice if you want to reverse this action. But check out the video for a great demo of this.
